Why & How We Traded BCH: Trading Explanation
- Apr 19, 2025
- 3 min read
Updated: 4 days ago
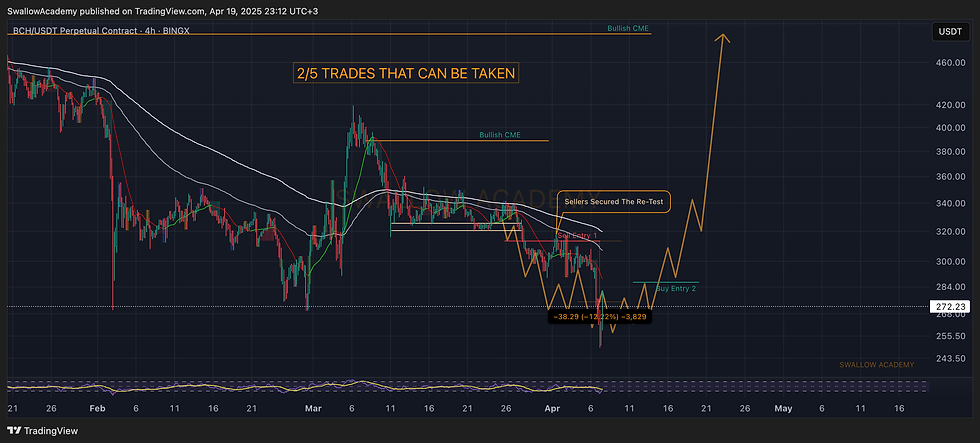
THE START The BCH trade setup we shared on March 25th in our Technical Analysis (Tap Me) channel, which outlined 5 possible scenarios — out of those, 2 entries played out perfectly and gave us solid trades. Clean setup and clean execution 🤝

DETECTED MULTIPLE CMEs + PRESSURE INSIDE SUPPORT AND 200EMA Bitcoin Cash (BCH) caught our attention as it started showing multiple opportunities through different price movements. This time, instead of sharing a classic TA with a specific entry, target, and stop zone — we decided to give an early heads-up on several possible scenarios that could unfold. A different approach, but one that gave our members a broader view of the potential setups forming. 1. Buy Trades: Possible Moves (Shared in TA as well)
Buy Entry 1: Once we see a breakout from the 200EMA line and we see a successful re-test of it, we are going to look for long up until the first bullish CME near $385.
Buy Entry 2: If we see markets to dip more, then BCH will follow with testing to local lows, where we will be looking for some kind of market structure break to occur, which would give us the confidence for upward movement.
2. Sell Trades: Possible Moves (Shared in TA as well)
Sell Entry 1: If we see a breakdown from local support at $320 and sellers manage to secure it with proper re-test, we will be seeing a dip towards the $275.
Sell Entry 2: Once we see the fill of bullish CME and first signs of weakness, we are going to look for market structure breaks on smaller timeframes like 30M, where then we would be looking for movement towards the 200EMA (for a quick re-test).
Sell Entry 3: If we see a huge optimistical push currently that would break both Bullush CMEs and reach the highest one, then we will be looking for a quick rejection there without any MSB to form, just pure volatility hunting! We shared detailed explanations for each potential movement we could see on BCH — all laid out clearly for our members. From that point on, it was just a waiting game to see which scenario would play out and we saw the dominance from sellers on the markets with Sell Entry 1 broken and secured.

TARGET REACHED & STARTING TO AIM FOR BUY ENTRY 2 We reached our target at $275, securing a solid 12% move on the coin. Now, our focus shifts to Buy Entry 2 — we’ll be watching for a recovery in price followed by a clear Market Structure Break (MSB) to confirm the next setup.

Market Structure Break + Successful Re-Test
Now that we’ve formed a clean Market Structure Break (MSB) nearly aligned with our planned entry, we got a successful re-test and a solid fill of Fair Value Gaps (FVGs). After that, buying volume took over, giving us the confirmation we needed — long position was opened.

Market Structure Break + Successful Re-Test
Buyers took full control of the movement, giving us a solid 30% push. Around that zone, we decided to close our positions — both trades played out exactly how we wanted.

THE END Sell Entry 1 and Buy Entry 2 both played out nicely — the short position gave us a clean 12% move, while the long position delivered a solid 30% market price movement. Overall, 2 out of the 5 planned scenarios worked out well.
"This kind of TA perfectly shows how we prepare our setups, stay patient, and wait for clear signs from the market before executing trades." Swallow Academy Official Socials: Swallowteam.com/links


